How To Install and Configure Postfix
Introduction To Postfix
Postfix is a popular open-source mail transfer agent widely used for sending and receiving email on Linux servers. It is known for its simplicity, reliability, and security, making it a good fit for sending emails on an Ubuntu server. Installing Postfix allows you to send emails via SMTP (Simple Mail Transfer Protocol).
There are several reasons why Postfix is a good choice. Firstly, it is straightforward to set up and configure, even for users who are new to Linux. Postfix also has several built-in security features, such as support for SSL/TLS encryption, which helps protect your email from being intercepted or compromised by third parties. Additionally, Postfix is highly customizable, allowing you to fine-tune its behavior and settings to meet your specific needs.
How To Install Postfix On Your Ubuntu Server
To begin, from the Command Line Interface of your server, update your server with the following command:
sudo apt updateThen run the following command to install Postfix:
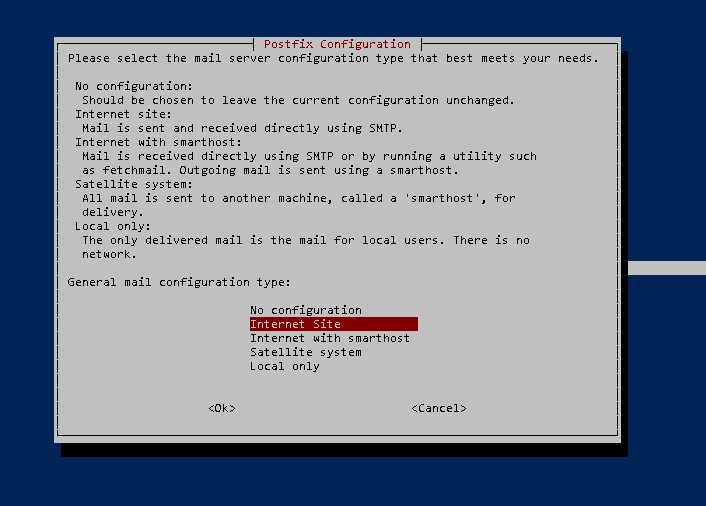
sudo apt install mailutilsNear the end you will be prompted with this screen:
The default option 'Internet Site' is correct for our use case. Hit 'Tab' and enter to continue.
Next, you'll be prompted to enter your domain. You need to enter the domain name we registered with Google Domains. In my example, it would be 'quailavocadotoast.com'.
Then hit 'Tab' and 'Enter' to continue.
Now we need to run one more command to make sure Postfix works properly.
sudo dpkg-reconfigure postfixThis command will restart the initial configuration process you went through when you installed Postfix, with a few more screens. Just hit 'Tab' and 'Enter' until you come to the third screen. It will look like this:
Type in the email address you wish to receive emails to from this server then hit 'Tab' and 'Enter' to go to the next screen which will look like this.
Use your arrow keys and backspace or delete key to remove the first part that says localhost.members.linode.com and replace it with $myhostname. No, don't put your hostname in, literally type in $myhostname
You should see your domain as the second entry because we set that in a previous step of the postfix configuration. If you don't, add it like in the example below.
When you're done it should look like this:
Hit 'Enter' without hitting 'Tab' on the next screen to keep synchronous updates set to no.
On the next screen, grab the subnet you established in the docker-compose.yml file. Delete everything after the first IP address and enter your subnet instead.
Here's what it will look like by default:
Here's what it needs to look like:
Hit 'Tab + Enter' on the next two screens until you come to the last screen for Internet protocols. Use the down arrow key to make sure that ipv4 is highlighted and then 'Tab + Enter' to exit this configuration.
Postfix will take a few moments to update itself.
How To Properly Configure Postfix
Editing Postfix Main.cf
With that done, we need to edit two files to make sure Postfix is properly configured for our purposes.
Use the following command to access the Postfix 'main.cf' file.
sudo nano /etc/postfix/main.cfWe have to make a few changes to this file, and I'll give you two options.
You can manually add and edit the lines we need. Option 1
Or you can delete all the lines in the file (hold CTRL+K until all the lines are gone) and paste in my copy of the entire file and just change a couple of things. Option 2
Either option is fine, and I'll highlight the things that need to be correct. Here we go.
Option 1: Manually Edit The File
- Add the following lines underneath the '#TLS parameters' section.
tls_random_source=dev:/dev/urandom smtpd_use_tls=yes - Replace the next two lines
smtpd_tls_cert_file=/etc/ssl/certs/ssl-cert-snakeoil.pem
smtpd_tls_key_file=/etc/ssl/private/ssl-cert-snakeoil.key
with the following
smtpd_tls_cert_file=/etc/tls/certs/pf.crt smtpd_tls_key_file=/etc/tls/private/pf.key - Add the following line underneath 'smtpd_tls_security_level=may'.
smtp_use_tls=yes - Change the line
myhostname = localhost.members.linode.com
to
myhostname = quailavocadotoastInserting your host name (of your server).
- Add the following line at the end of the file:
smtp_generic_maps = hash:/etc/postfix/generic - Save and exit this file with 'CTRL + X', 'y', and 'Enter'.
Option 2: Replace The Entire File
Note: Don't do this if you followed the steps above. This is an alternative method to complete the above steps. In the following code block, I've made the elements you need to change bold.
- Replace the bold quailavocadotoast.com with your domain.
- Replace the bold quailavocadotoast with the hostname of your server.
- Replace the bold 10.133.233.0/29 with the subnet you setup for your docker-compose.yml file.
# See /usr/share/postfix/main.cf.dist for a commented, more complete version


# Debian specific:  Specifying a file name will cause the first
# line of that file to be used as the name.  The Debian default
# is /etc/mailname.
#myorigin = /etc/mailname

smtpd_banner = $myhostname ESMTP $mail_name (Ubuntu)
biff = no

# appending .domain is the MUA's job.
append_dot_mydomain = no

# Uncomment the next line to generate "delayed mail" warnings
#delay_warning_time = 4h

readme_directory = no

# See http://www.postfix.org/COMPATIBILITY_README.html -- default to 3.6 on
# fresh installs.
compatibility_level = 3.6


# TLS parameters
tls_random_source=dev:/dev/urandom
smtpd_use_tls=yes
smtpd_tls_cert_file=/etc/tls/certs/pf.crt
smtpd_tls_key_file=/etc/tls/private/pf.key
smtpd_tls_security_level=may
smtp_use_tls=yes
smtp_tls_CApath=/etc/ssl/certs
smtp_tls_security_level=may
smtp_tls_session_cache_database = btree:${data_directory}/smtp_scache


smtpd_relay_restrictions = permit_mynetworks permit_sasl_authenticated defer_unauth_destination
myhostname = quailavocadotoast
alias_maps = hash:/etc/aliases
alias_database = hash:/etc/aliases
myorigin = /etc/mailname
mydestination = $myhostname, quailavocadotoast.com, localhost, localhost.localdomain, localhost
relayhost =
mynetworks = 127.0.0.0/8 10.133.233.0/29
mailbox_size_limit = 0
recipient_delimiter = +
inet_interfaces = all
inet_protocols = ipv4
smtp_generic_maps = hash:/etc/postfix/generic
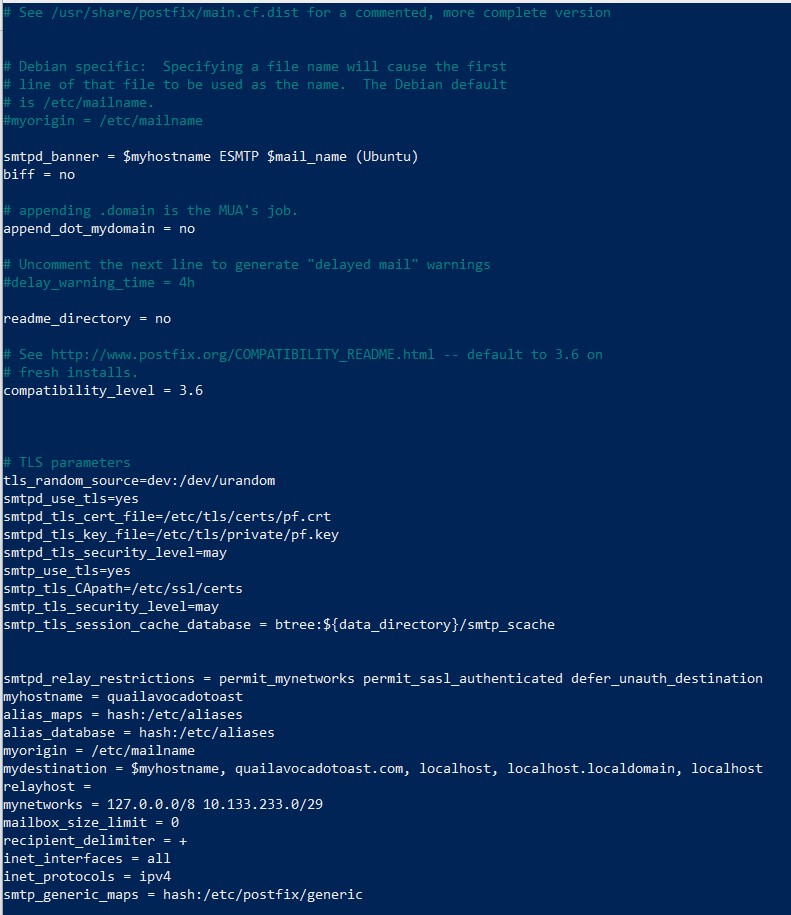
When you're done, your file should look like this.
Press 'CTRL+X' and press 'y' then 'Enter' to save the file with your changes.
Editing Postfix Master.cf
Now we need to edit another file, our Postfix Master file.
Use this command to access it:
sudo nano /etc/postfix/master.cfIn here, you need to uncomment (delete the '#' in front of) the 19th line that looks like this:
#submission inet n - y - - smtpdSo it looks like this
submission inet n - y - - smtpdThen uncomment the 21st and 22nd line and change the 22nd line from 'yes' to 'no. Here's what they look like by default
#  -o smtpd_tls_security_level=encrypt
#  -o smtpd_sasl_auth_enable=yes
and here's what they need to look like
 -o smtpd_tls_security_level=encrypt
 -o smtpd_sasl_auth_enable=no
Important: There will be an extra space in front of each line when you uncomment them. You need to delete that extra space so that there is only one space in front of these two lines.
Here's what your changes need to look like.
Save and exit this file with 'CTRL + X', 'y', and 'Enter'.
Post Mapping
Now if we finished here, our emails would work just fine. However, let's make two more quick changes to make it look very polished and professional.
Use the following command to open up a new blank text file that we referenced in our main.cf file, so we can map out proper names for our server users.
sudo nano /etc/postfix/genericInside of this text file add the following lines
root@localhost root@mydomain.com
user@localhost user@mydomain.com
Replace user with the name of your Limited User Account we've been using thus far, and replace mydomain.com with the domain you registered.
Here's what mine looks like:
Save and exit this file, then run the following command from your Command Line Interface to load the maps we just created into Postfix.
sudo postmap /etc/postfix/genericNow run this command to restart Postfix and save our changes:
sudo systemctl restart postfixMapping An Alias For Root
Let's also map an alias for our root user so that emails sent to root come to our desired email.
sudo nano /etc/aliasesThis will open up your aliases file.
You'll see at the top that 'postmaster: root', which is fine.
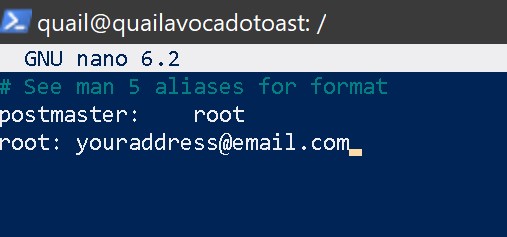
Add a second line below that like the example below, where we assign an email address to 'root'.
Exit and save this file with 'CTRL + X', 'y', and 'Enter'.
Run this command to make your new alias take effect.
sudo newaliasesConfiguring Our Firewall For Postfix
Finally, let's create a rule for our firewall that will let Postfix listen for emails from our Bitwarden Docker container that we'll setup later. If we don't have this rule established, we won't be able to receive admin emails from our Bitwarden server.
From your Command Line Interface, enter the following command. Replace the bold subnet 10.133.233.0/29 with the same subnet you established above for the docker-compose.yml file.
sudo ufw allow from 10.133.233.0/29 to 0.0.0.0/0 port 587 comment 'Allow POSTFIX access from containers'Then reload your firewall.
sudo ufw reloadNow we're ready to move to the next lesson and test our emails!


